

When organizing a group dinner, start with the people who must be there and the details that affect attendance. A date alone is not enough if the location, cost, or start time will determine whether people can join.
Decide the outline before collecting responses, then confirm the venue and final arrangements separately.
1. Check the guest of honor and the decision rule
For a welcome or farewell event, ask the guest of honor for workable dates first. Also decide whether everyone must attend or whether the gathering can proceed with the largest available group.
Sending many options that the key guest cannot attend creates avoidable coordination later.
2. Offer dates with a time, area, and budget
Three to five options can be a useful starting point, but this is not a fixed rule. Use options that fit the group's actual constraints.
Include an approximate end time, a proposed area, an estimated cost per person, and whether late arrival is possible. “Friday works” may change when someone discovers the event starts too early or takes place far away.
To compare an 18:00 start with a 19:00 start on the same date, follow the steps for offering separate time slots. Include an end time for each option.
3. Example: the initial group message
We are planning a welcome dinner for [name]!

Proposed area: Near [station/area]
Time: Around 7–9 pm
Budget: About [amount] per person
Response deadline: [Date and time]

Please mark each date as available, tentative,
or unavailable:
[Participant URL]

If tentative, add a short note such as “I can join after 8.”
Please respond even if none of the dates work.

I will send the confirmed date and venue afterward.
Clearly label an unbooked venue as proposed. For other message styles, see templates for sharing a scheduling link.
4. Leave time between the deadline and the event
Set a response deadline that leaves room to compare answers and check numbers before booking. A large group or busy season may require an early check of venue availability.
If you configure a deadline on the scheduling page, match it to the message. A brief reminder can help near the deadline, but do not ask people who have already responded to enter everything again.
5. Check tentative attendees before reserving seats
The most popular date still needs to work for any essential guest. Ask tentative attendees whether their conditions can be resolved before including them in the booked headcount.
Provide a private way to discuss dietary requirements or allergies instead of asking everyone to post sensitive details to the group.
Check the venue's actual rules for headcount changes, seating, set menus, and cancellations. Do not invent a universal deadline or cancellation fee.
Worked example: a welcome dinner with 5 people
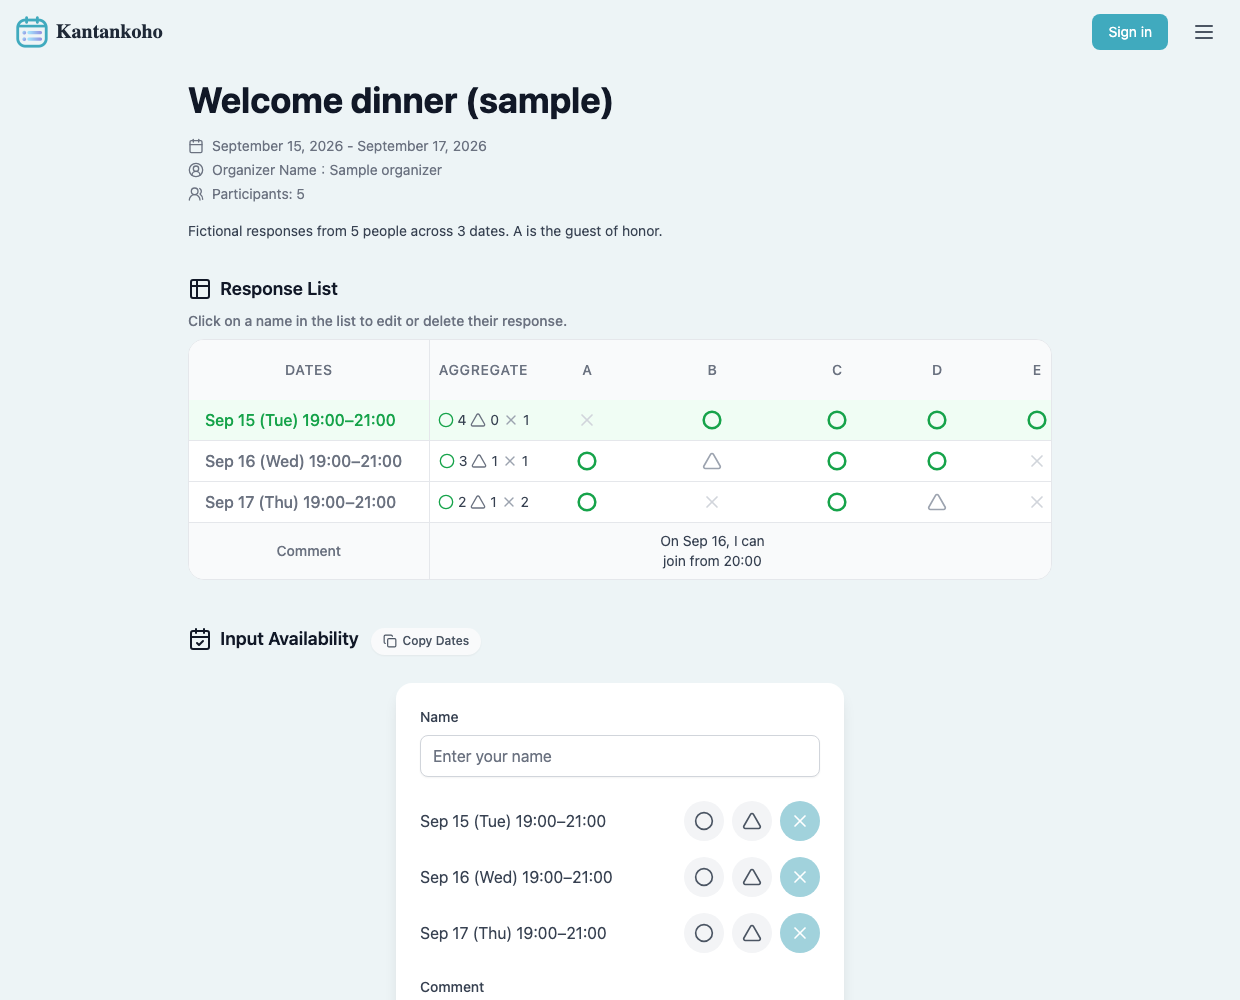
Suppose A is the guest of honor, and you offer September 15, 16, and 17 from 19:00 to 21:00. These are fictional responses for this example.
 View full-size image (new tab)
Sample answers in the actual response screen. Check the guest of honor's availability, then clarify tentative answers before reserving seats.
| Option | ○ | △ | × | A, the guest of honor |
|---|---|---|---|---|
| Sep 15, 19:00–21:00 | 4 | 0 | 1 | Unavailable |
| Sep 16, 19:00–21:00 | 3 | 1 | 1 | Available |
| Sep 17, 19:00–21:00 | 2 | 1 | 2 | Available |
September 15 has four available people, but it does not work for a dinner welcoming A. Consider September 16 first, then check B's comment: "On Sep 16, I can join from 20:00."
Do not reserve for four confirmed guests yet. A, C, and D can attend from 19:00. Confirm B's late arrival and whether the restaurant can accommodate it, including any set-menu timing. Reserve only once the headcount and conditions are agreed.
If you move the start to 20:00, ask everyone again and include the new end time. Being available for the original time does not imply agreement to a different time. If everyone must attend, look for another option that also works for E.
Choose candidate times for your dinner
6. Send the confirmed arrangements
Thank you for responding! The dinner is confirmed:

Date and time: [Date], 7–9 pm
Venue: [Name]
Location: [Address or map link]
Cost: [Amount] per person
Meet at: The entrance at 6:55 pm

If your attendance changes, please contact [organizer]
by [date and time].
If you are delayed on the day, use [contact method].
Base the change deadline on the venue arrangements you have confirmed. See more confirmation examples for the final message.
Kantankoho lets participants respond without creating an account. Follow the basic creation and sharing steps, then handle the final date decision and venue reservation separately.