

Kantankoho's Auto selection can find free time around your Google Calendar events and copy it as text. The workflow is Google sign-in → extraction settings → Auto → review and copy.
This example uses a day with meetings at 10:00–11:00 and 14:00–15:00, with lunch excluded. The screenshots show the actual application operating on fictional calendar data.
1. Choose the workflow you need
| Goal | Method |
|---|---|
| Paste your free time into email or chat | Extract it in Kantankoho and copy the text |
| Compare calendars already shared by colleagues | Use Google Calendar's Find a time features |
| Let someone book a time and add it to your calendar | Use Google Calendar appointment schedules |
| Collect group availability before deciding | Review candidates, then create a Kantankoho response page |
Google's calendar comparison instructions require the other person's calendar to be shared with you. Appointment schedules accept bookings; they serve a different purpose from writing a list of proposed dates.
2. Sign in and load your calendar
Open Kantankoho, sign in with Google, and review the requested calendar access. Once events appear, use week view on desktop. Automatic selection is unavailable in month view.
The extraction includes your calendar and any shared calendars you have selected. Check the intended calendars first. It does not retrieve every participant's calendar without sharing or permission.
You can still manually select and copy dates without connecting Google. See the free, no-sign-up tool comparison for those conditions.
3. Set the hours and exclude lunch
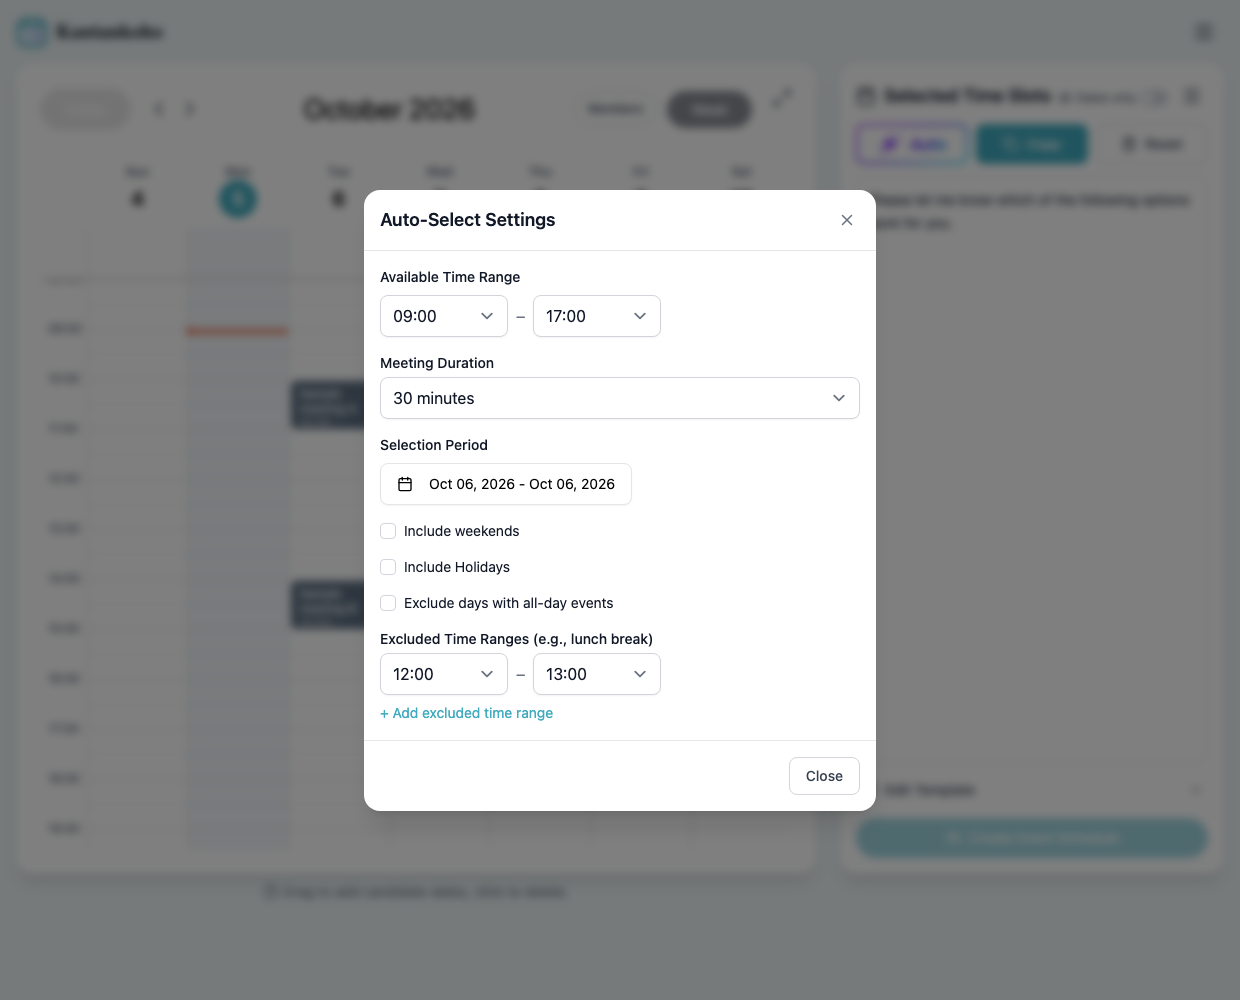
Open the settings icon beside the selected-dates heading. On a phone, use the auto-selection settings in the bottom bar. This example uses:
| Setting | Example |
|---|---|
| Time range | 09:00–17:00 |
| Meeting duration | 30 minutes |
| Date range | October 6, 2026 only |
| Excluded hours | 12:00–13:00 |
| Weekends and holidays | Not included |
 View full-size image (new tab)
Settings used with fictional events. Replace the date with the future period you want to schedule.
Meeting duration is the minimum length of free time to look for. Choosing 30 minutes does not split every available range into individual 30-minute options. A continuous two-hour opening can remain one range.
4. Review the extracted result
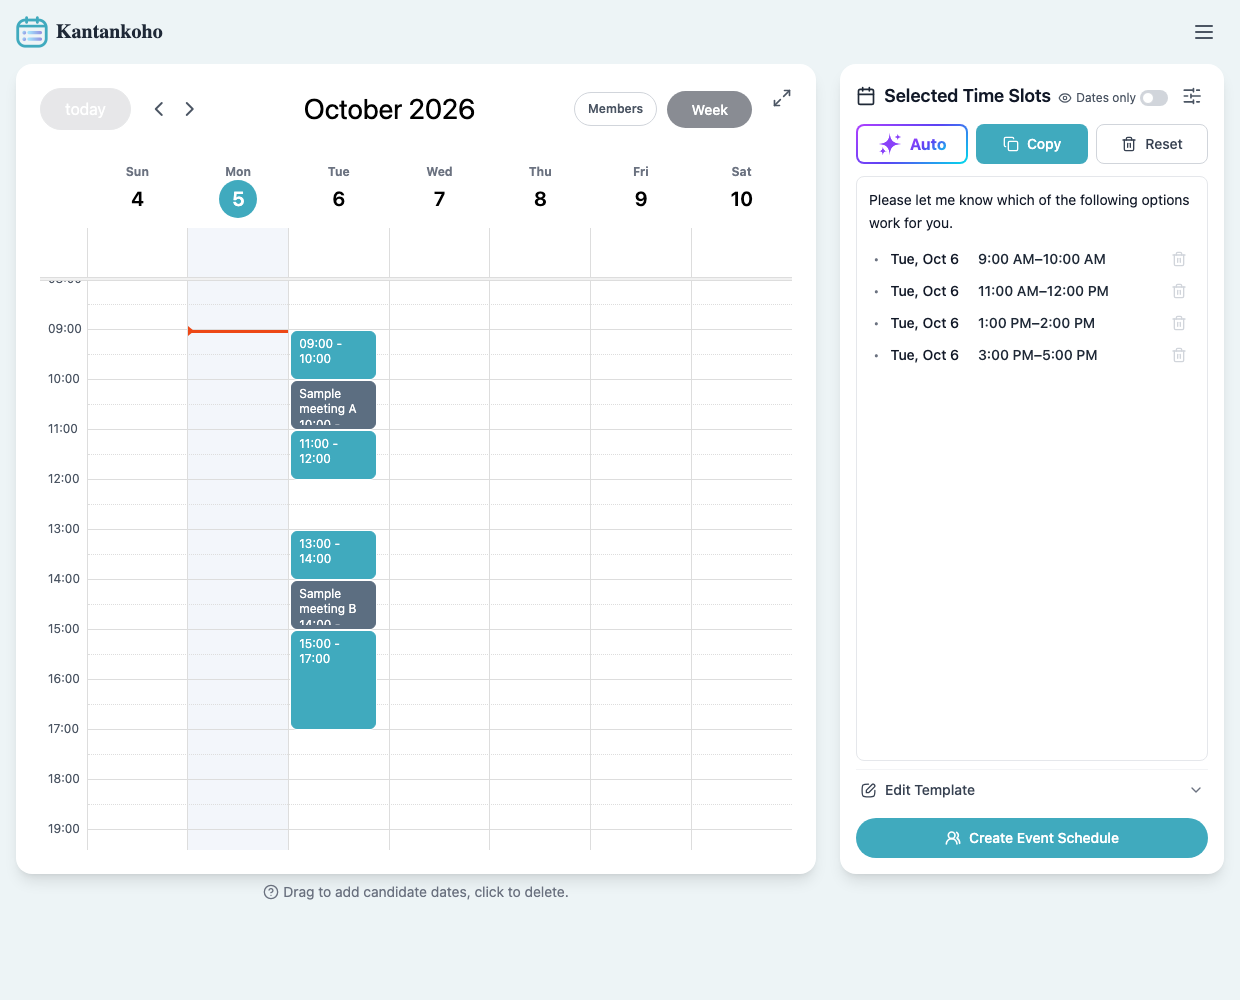
Close the settings and select Auto. In this example, the two meetings and excluded lunch period leave four free ranges.
 View full-size image (new tab)
The real auto-selection workflow ran on fictional data. No personal Google Calendar events were used.
With date-only display turned off, the candidate portion of the copied text is:
Tuesday, October 6
• 9:00 AM–10:00 AM
• 11:00 AM–12:00 PM
• 1:00 PM–2:00 PM
• 3:00 PM–5:00 PM
Allow for travel and preparation yourself. If you need preparation before the 10 am meeting, do not offer the full 9–10 am range unchanged.
5. Turn free ranges into 30-minute proposals
To ask someone to choose a specific half hour, click a range's time in the selected list and edit its start and end. Remove unwanted options. Here, you could keep 11:00–11:30 and 15:00–15:30. See the time-slot guide for the editor.
Copy the dates, then add the meeting duration, location or format, and time zone. For example, after narrowing the options:
Could we arrange a 30-minute online meeting?
Please let me know which of these times works for you:

Tuesday, October 6
• 11:00–11:30 AM
• 3:00–3:30 PM

All times are Japan Standard Time (JST).
If neither works, please suggest another time.
Copying dates does not require creating a scheduling page. For group responses, choose Create Event and Schedule, create the page, and share its participant URL.
6. When the result is not what you expected
| Symptom | Check |
|---|---|
| Auto is missing | Sign in with Google |
| Week-view message appears | Switch from month to week view |
| Reconnect or reload is shown | Restore calendar loading before extracting |
| Few or no candidates | Check the period, required duration, excluded hours, and selected calendars |
| A date with an all-day event is included | Check the setting that excludes days with all-day events |
| The result says all day | Review days without timed events in the selected hours; choose explicit times before sharing |
| Copied text has no times | Turn off date-only display |
Do not send an all-day label as a promise of 24-hour availability. Check the configured hours and breaks. Extraction does not reserve a slot or finalize a meeting. Wait for responses, decide on a time, and send a confirmation.